You can create seating charts for your classes in GradeBook. Refer to the following topics:
•“Adding Desks to a Seating Chart”
•“Deleting Desks from a Seating Chart”
•“Adding Labels to a Seating Chart”
•“Moving Desks and Labels on a Seating Chart”
•“Deleting Labels on a Seating Chart”
•“Editing Seating Chart Preferences”
•“Entering Attendance on a Seating Chart”
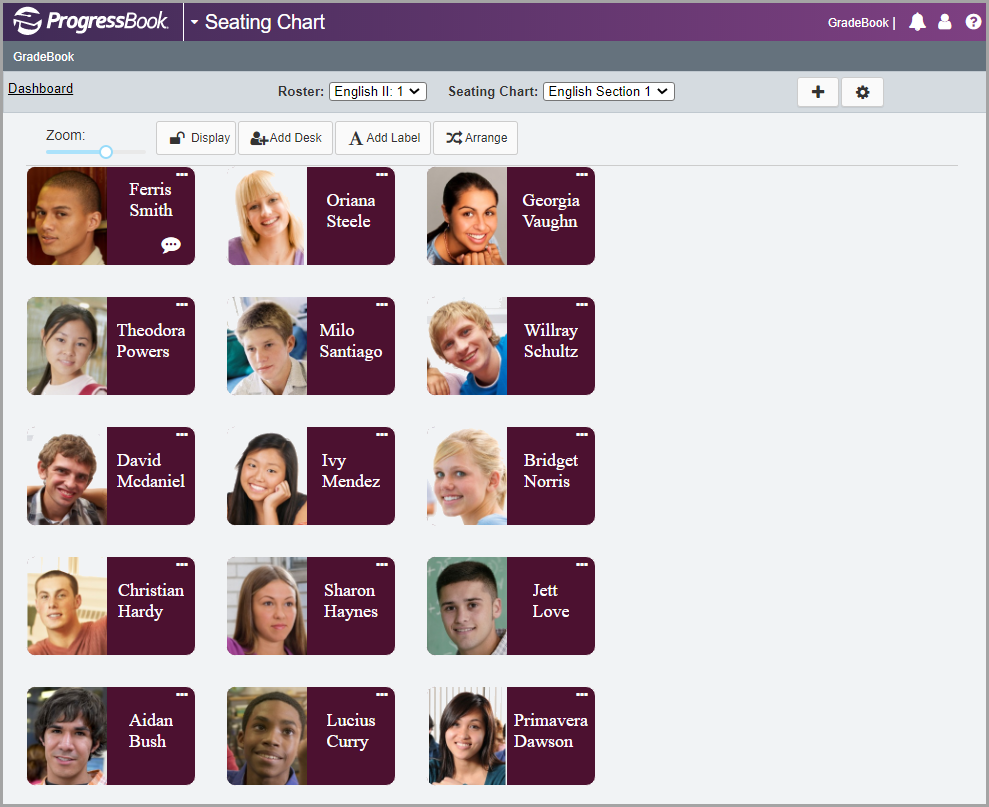
You can create a seating chart that includes customized information about each student. GradeBook provides many options for adjusting the color and size of desks, displaying students’ pictures on desks, and displaying comments. You can create multiple seating charts for each roster.
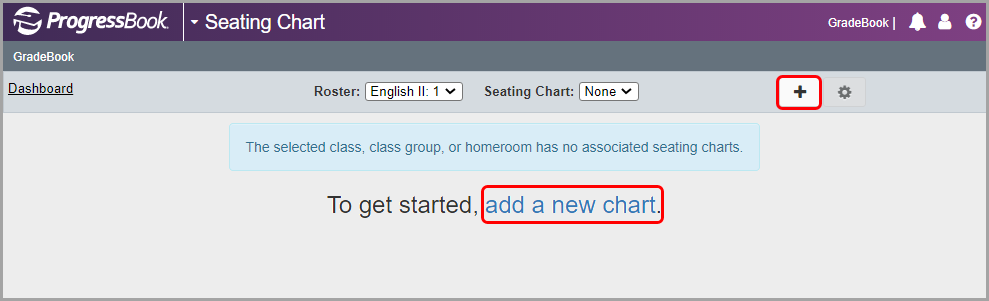
1.On the Teacher Home Page or Class Dashboard, below Class Administration or Classroom Administration, respectively, click Seating Chart.
The Seating Chart screen displays.
2.(Conditional) If you accessed the seating chart from the Teacher Home Page, in the Roster drop-down list, select the class, class group, or homeroom for which you want to create a seating chart.
3.If you have not created a seating chart for this roster, click
or add a new chart.
|
|
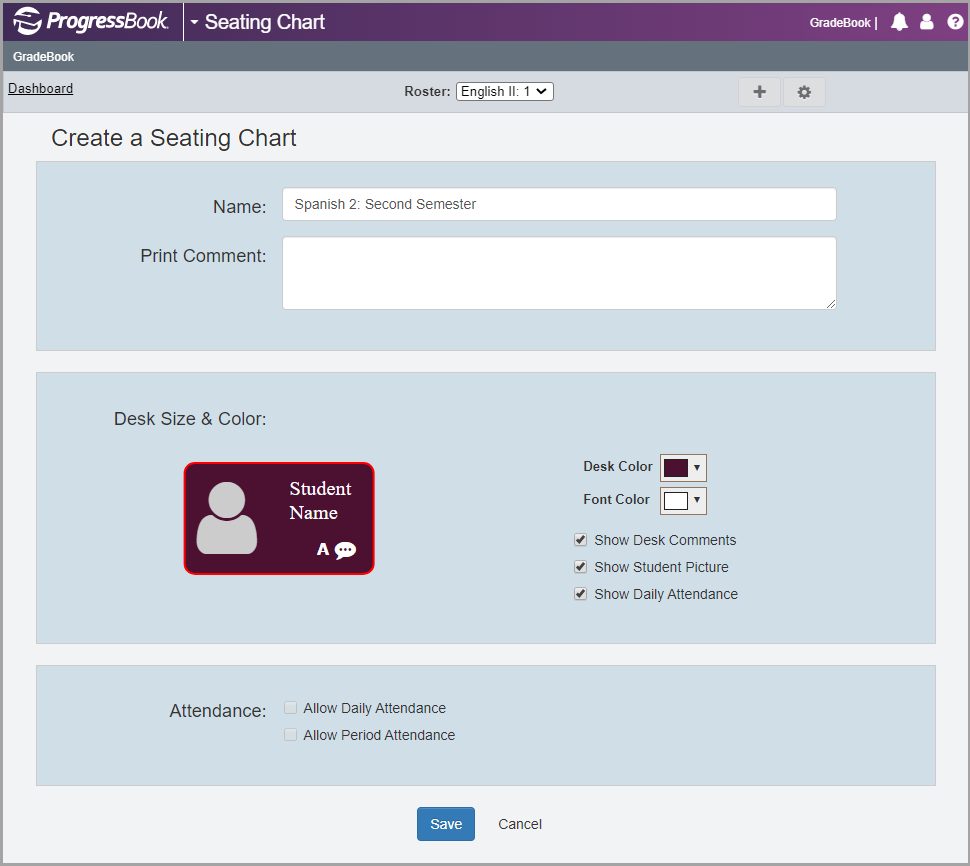
The Create a Seating Chart screen displays.
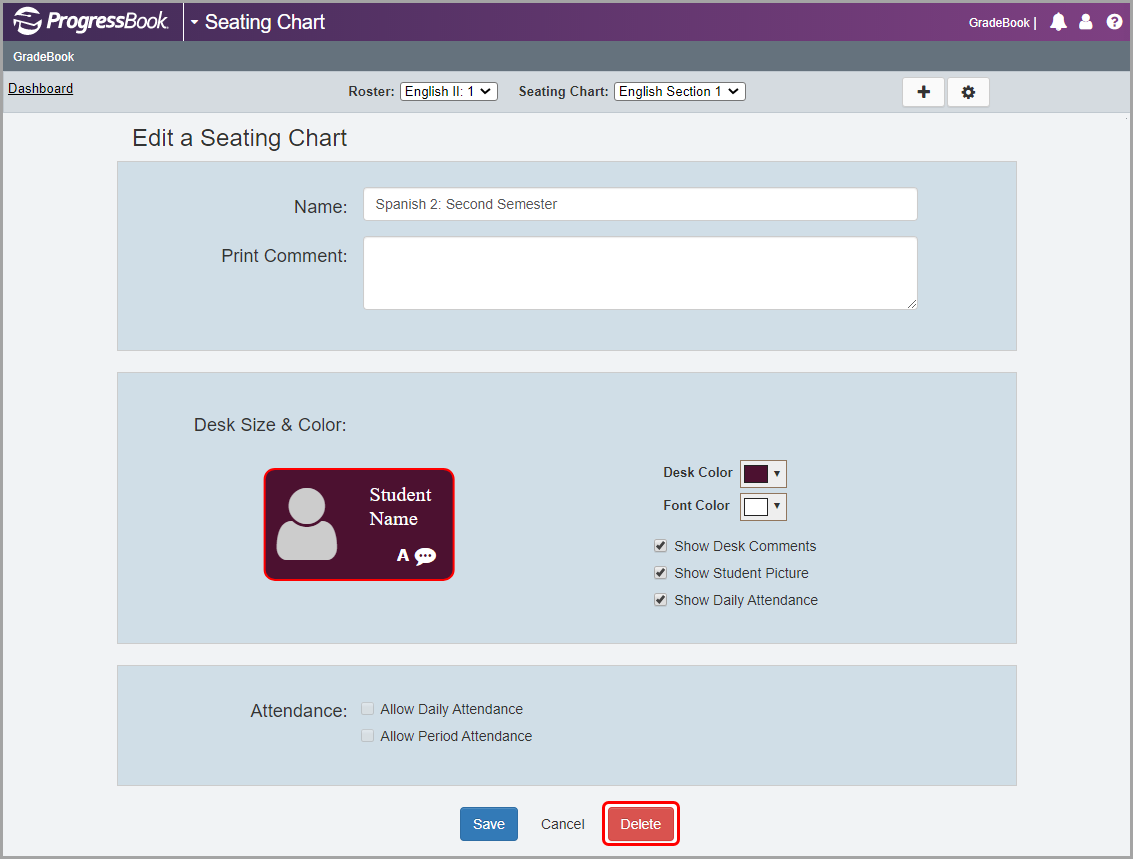
4.In the Name field, enter the name for the seating chart.
5.(Optional) In the Print Comment field, enter any comments you want to display on the printed seating chart.
6.In the Desk Size & Color area, complete any combination of the following tasks:
•In the Desk Color drop-down list, select a color for the desk.
•In the Font Color drop-down list, select a color for the student’s name and other text on the desk.
•Select the Show Desk Comments checkbox to display individual student comments on each desk by default.
•Select the Show Student Picture checkbox to display student pictures, when available, on each desk.
•Select the Show Daily Attendance checkbox to display the daily attendance code for each student on each desk.
7.In the Attendance area, select either or both of the following checkboxes:
•Allow Daily Attendance – In the Daily Attendance view, this option lets you select a daily attendance code from a drop-down list on each desk.
•Allow Period Attendance – In the Period Attendance view, this option lets you select a period attendance code from a drop-down list on each desk.
8.Click Save.
|
|
You can now add desks and labels to the seating chart as desired.
Adding Desks to a Seating Chart
You can add individual desks manually, or you can automatically arrange desks for your entire roster.
Adding Individual Desks
1.At the top left of the seating chart, click Edit.
|
|
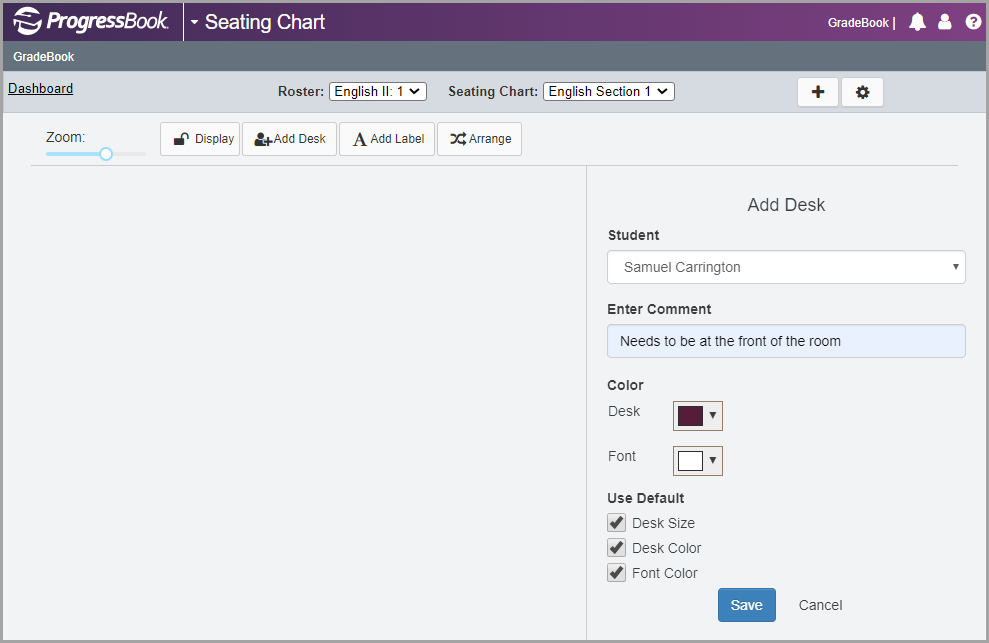
2.Click Add Desk.
|
|
The Add Desk panel displays on the right side of the screen.
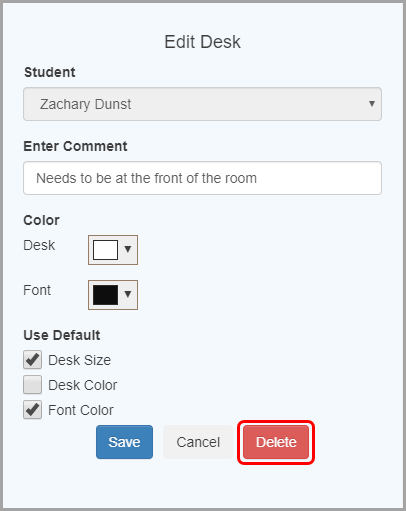
3.In the Select Student drop-down list, select the student for whom you want to add a desk.
4.(Optional) In the Enter Comment field, enter any comments you want to display on this student’s desk. If you selected the Show Desk Comments checkbox when creating the seating chart, the comment you enter here displays on the desk. This comment also displays when you hover your cursor over
on the desk.
5.(Optional) Select a different Desk Color and Font Color for this student.
6.(Optional) If you do not want this student’s desk to use the default desk size, desk color, or font color, deselect the Use Default Desk Size checkbox, the Use Default Desk Color checkbox, and the Use Default Font Color checkbox, respectively. You can also use these checkboxes to reset a changed desk to the default size and colors.
7.Click Save.
|
|
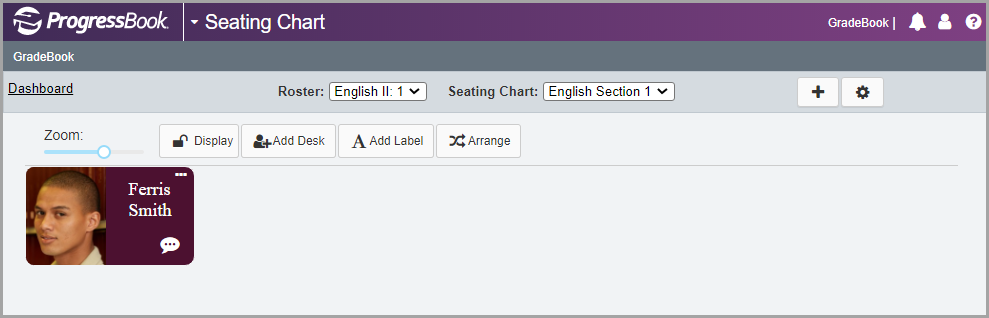
The desk displays at the top left of the seating chart automatically. You can move the desk manually as desired.
|
|
Automatically Arranging Desks
Note: If you are arranging desks immediately after creating a new seating chart, the Desk Arrangement panel displays automatically and you do not need to complete step 1 and step 2.
1.At the top left of the screen, click Edit.
|
|
|
|
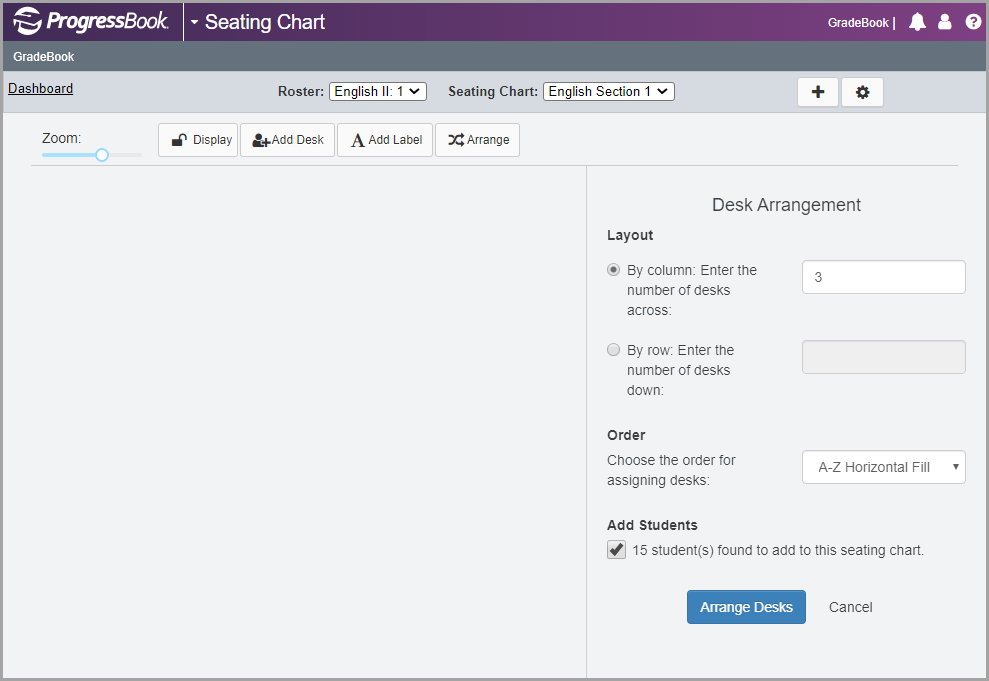
The Desk Arrangement panel displays on the right side of the screen.
3.In the Layout section, select either By column or By row.
•If you selected By column, in the Enter the number of desks across field, enter the number of desks you want to display across a row.
•If you selected By row, in the Enter the number of desks down field, enter the number of desks you want to display down a column.
4.In the Order section, in the Choose the order for assigning desks drop-down list, select one of the following sort orders:
•A-Z Horizontal Fill
•A-Z Vertical Fill
•Z-A Horizontal Fill
•Z-A Vertical Fill
•Roster Order Horizontal Fill (this option respects the order you have designated for your class on the Class Roster screen)
•Roster Order Vertical Fill (this option respects the order you have designated for your class on the Class Roster screen)
•Random
5.In the Add Students section, select the [#] student(s) found to add to this seating chart checkbox.
6.Click Arrange Desks.
|
|
The desks display on the screen and you can make further changes as necessary. To close the Desk Arrangement panel, click

.
|
|
Deleting Desks from a Seating Chart
You can delete a student’s desk from the seating chart.
1.At the top left of the desired seating chart, click Edit.
|
|
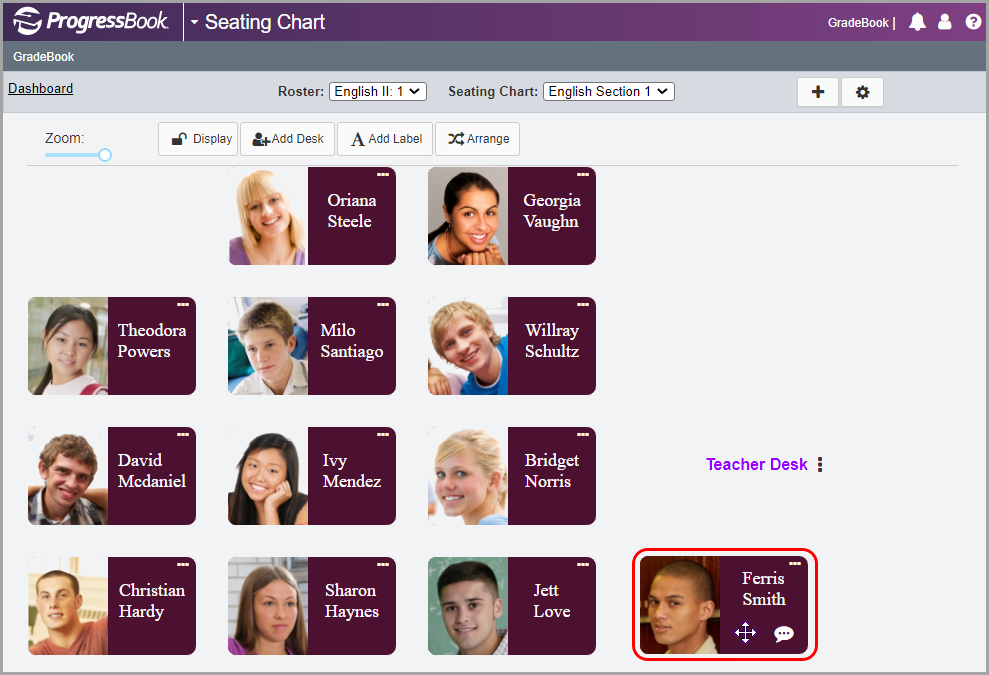
2.At the top right of the desk you want to delete, click
.
3.On the Edit Desk panel that displays, click Delete.
|
|
The desk you chose to delete no longer displays on the seating chart.
1.To edit an existing seating chart, on the Teacher Home Page or Class Dashboard, click Try New Seating Chart.
2.(Conditional) If you accessed the seating chart from the Teacher Home Page, in the Roster drop-down list, select the class, class group, or homeroom for which you want to create a seating chart.
3.(Conditional) If you have more than one seating chart associated with this roster, in the Seating Chart drop-down list, select the desired seating chart.
4.To make changes to the design of the seating chart, click Edit.
|
|
Adding Labels to a Seating Chart
1.At the top left of the desired seating chart, click Edit.
|
|
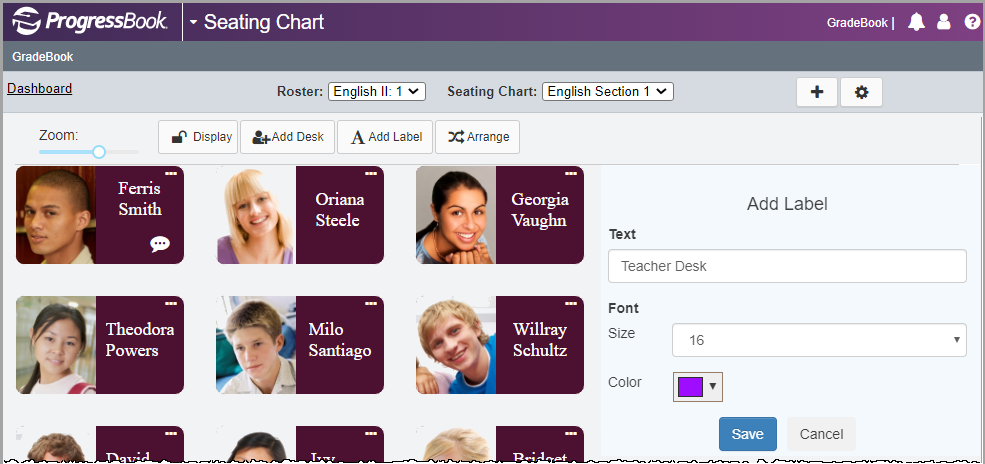
2.Click Add Label.
|
|
The Add Label panel displays on the right side of the screen.
3.In the Enter Text field, enter text that you want to display on the label.
4.In the Select Font Size drop-down list, select the desired size for the text on the label.
5.In the Font Color drop-down list, select the desired color for the text on the label.
6.Click Save.
|
|
The label you added displays at the top left of the seating chart.
7.Use your cursor to grab the label and drag it to the desired location on the seating chart.
|
|
8.At the top left of the screen, click Display to lock your changes and prevent further movement of items on the screen.
|
|
Moving Desks and Labels on a Seating Chart
1.At the top left of the desired seating chart, click Edit.
2.Use your cursor to grab the desk or label and drag it to the desired location on the seating chart. Repeat as necessary for each desired item.
|
|
3.At the top left of the screen, click Display to lock your changes and prevent further movement of items on the screen.
|
|
Deleting Labels on a Seating Chart
You can delete a label from the seating chart.
1.At the top left of the desired seating chart, click Edit.
|
|
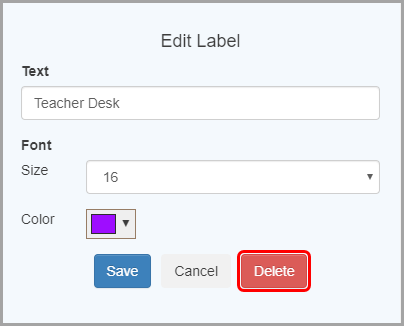
2.On the right side of the label you want to delete, click
.
3.On the Edit Label panel that displays, click Delete.
|
|
The label you chose to delete no longer displays on the seating chart.
Editing Seating Chart Preferences
1.At the top right the desired seating chart, click
.
|
|
2.Edit any of the existing settings. For more information, see “Creating a Seating Chart.”
3.Click Save.
Entering Attendance on a Seating Chart
Based on your seating chart preferences, you can take daily and/or period attendance.
To enter daily attendance on a seating chart, in the preferences for the seating chart, the Allow Daily Attendance checkbox must be selected.
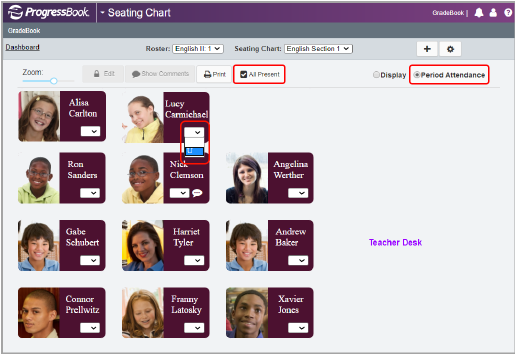
1.On the desired seating chart, select the Daily Attendance radio button.
2.On the desk for each student, in the drop-down list, select the appropriate daily attendance/absence code. Or, if all students are present, click All Present.
|
|
Your changes save automatically. The desk displays with the applicable absence code and a red outline.
To enter daily attendance on a seating chart, in the preferences for the seating chart, the Allow Daily Attendance checkbox must be selected.
Note: Entering period attendance by block is not supported on the Seating Chart. You must take period attendance by block on the Period Attendance screen.
1.On the desired seating chart, select the Period Attendance radio button.
2.On the desk for each student, in the drop-down list, select the appropriate period attendance/absence code. Or, if all students are present, click All Present.
|
|
Your changes save automatically.
1.At the top left of the desired seating chart, click Print.
|
|
2.Preview the seating chart and select print settings as necessary before printing.
1.At the top right of the desired seating chart, click

.
|
|
2.At the bottom of the Edit a Seating Chart screen, click Delete.
|
|