|
|
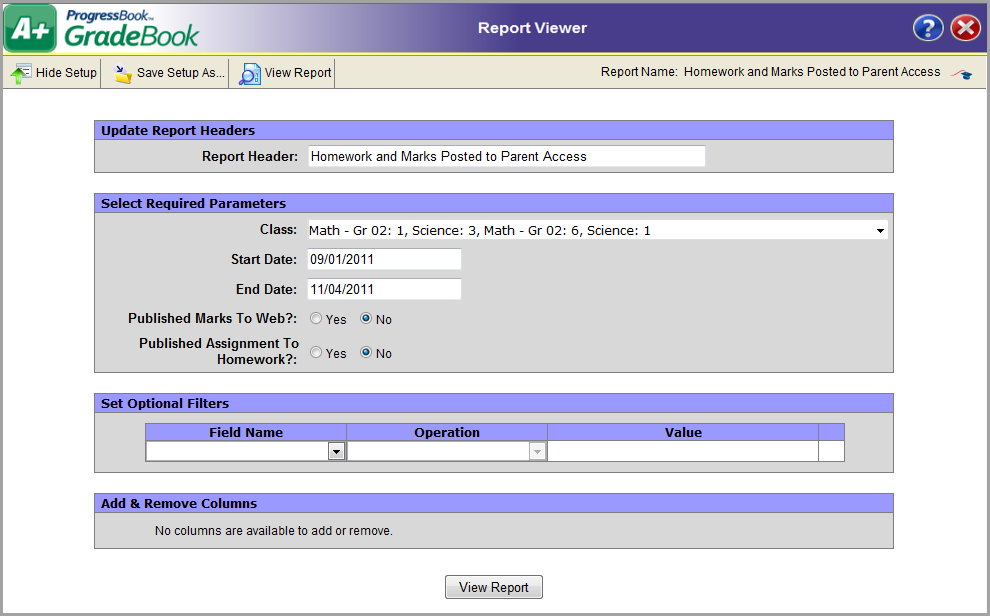
Homework and Marks Posted to ParentAccess
The Homework and Marks Posted to Parent Access report displays assignments and assignment types for individual or multiple classes within a date range with an indication of whether or not marks are posted to ParentAccess and the Frontline ProgressBook Parent & Student app.
1.From the Teacher Home Page, in the Select a Report drop-down list, select Homework and Marks Posted to Parent Access.
2.Click Run.
3.In the Report Header field, enter the name of the report. Homework and Marks Posted to Parent Access displays by default, but you may change the name, if desired.
4.In the Select Required Parameters area, in the Class drop-down list, select the appropriate class(es).
Note: Only the classes to which you have access display in list.
5.In the Start Date field, choose a date from the calendar.
6.In the End Date field, choose a date from the calendar.
7.In the Published Marks to Web option, select one of the following options:
•Yes – Displays assignments for which marks were posted to ParentAccess and the Frontline ProgressBook Parent & Student app
•No – Displays assignments for which marks were not posted to ParentAccess or the Frontline ProgressBook Parent & Student app
8.In the Published Assignment To Homework option, select one of the following options:
•Yes – Displays only classes in which homework and assignment marks were posted to ParentAccess and the Frontline ProgressBook Parent & Student app
•No – Displays only classes in which homework and assignment marks were not posted to ParentAccess or the Frontline ProgressBook Parent & Student app
9.In the Set Optional Filters area, select the following appropriate option in the Field Name list:
•Assigned Date – Date the assignment was assigned
•Assignment Name – Name of the assignment
•Assignment Type Name – Name of the assignment type
•Class Name – Name of the class
•Due Date – Date the assignment is due
•Floating Indicator – Indicates if this is floating assignment
•School Name – Name of the school
10.Select one of the following options in the Operation list if it is available. The available options may vary depending on the option you selected in the Field Name list.
•Is Equal To
•Is Not Equal To
•Is Before
•Is Before Or On
•Is After
•Is After Or On
•Begins With
•Does Not Begin With
•Ends With
•Does Not End With
•Contains
•Does Not Contain
•Has a Value
•Does Not Have a Value
11.In the Value field, enter the appropriate value.
Note: The available options and acceptable values vary depending on the option you selected in the Field Name drop-down list. You may be able to enter only alphabetical or only numeric characters depending on the option you selected in the Field Name drop-down list. If you selected an option in the Field Name drop-down list that ends in “Indicator,” then you must select the Yes or No option in the Value field. If you selected an option in the Field Name drop-down list that requires a date, a calendar becomes available in the Value field. If you selected Has a Value or Does Not Have a Value in the Operation drop-down list, then the Value field is not available.
12.Click View Report.
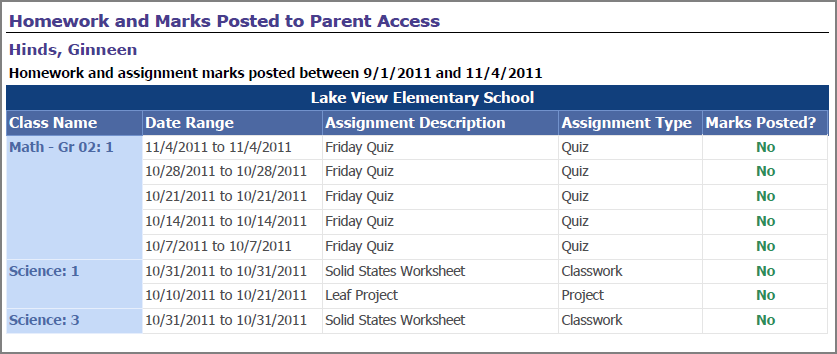
The report displays at the bottom of the window.
|
|
Note: The field or list displays red indicating an unacceptable value was entered or a required field was left blank.
13.To save the report with your selected parameters, filters, and columns, click Save Setup As. On the Save Setup As window in the New report name field, type the unique report name, and in the New description field, type the description of the report. Then, click Save.
The following message displays at the bottom of the window: “Report setup saved successfully.”
|
|