Completed IEP, ETR, and ISP tasks in SpecialServices Classic contain information required for reporting to Ohio’s Education Management Information System (EMIS). EMIS tools in SpecialServices Classic provide the ability to extract the information from these tasks to a file—the EMIS extract—and import the extract on the Special Education Import (SpS) screen in StudentInformation for further processing and final submission to EMIS.
To assist you in validating that the correct information displays in the EMIS extract, you can run the EMIS Review report, which lists students whose tasks contain information reportable to EMIS. The EMIS Review report also lets you view or edit (depending on your security privileges) the EMIS Data Collection Form. See “Running the EMIS Review Report.”
All IEP, ETR, and ISP tasks are included in the EMIS extract by default. You can choose to exclude specific tasks, if necessary. See “Excluding Tasks from EMIS.”
The EMIS extract contains only the information from selected tasks recorded in SpecialServices Classic; it does not contain all of the records or data elements required by EMIS. To complete the information required by EMIS, you must import the EMIS extract into StudentInformation.
The following records are generated when you create an EMIS extract:
•Student Attributes - Effective Date Record (FD) – Reports a change in the student’s disability information.
•Student Special Education Record (GE) – Reports each event for which information is completed on the Special Education Events form for students with a disability or students suspected to have a disability.
•Student Program Record (GQ) – Reports each service/program code selected in the IEP 7 Specially Designed Services form of a student’s IEP.
•Student Special Education Graduation Requirement Record (FE) – Reports each assessment area selected in the Graduations Tests section (if applicable) on the IEP 13 or SP 4 Exemptions form of a student’s IEP or ISP.
How Tasks Are Selected by Date Range in EMIS
The date range entered in the Start Date and End Date fields on the EMIS Extract screen and the EMIS Review screen determines how tasks are selected based on the following event dates:
•Meeting Date – The value entered in the Meeting Date field on the Cover Page of an ETR, IEP, or ISP task. For tasks to be included in the EMIS extract or on the EMIS Review report, the meeting date of the task must fall within the entered date range, including the first and last date in the range.
•Effective Dates – The values entered in the effective Start and End fields on the Cover Page of an IEP or ISP task. For tasks to be included in the EMIS extract or on the EMIS Review report, the effective dates of the task must fall within the entered date range but can start or end before, after or during the range.
For example, if the date range entered for
the EMIS Review report or EMIS extract is
06/01/2019 - 12/01/2019, tasks with the following meeting or effective
dates would display on the report:
•Any ETR, IEP, or ISP task with a meeting date of 06/01/2019 through, and including, 12/01/2019.
•Any IEP or ISP task with an effective start date before 06/01/2019 and an effective end date before 12/01/2019, such as 05/10/2019 - 08/09/2019.
•Any IEP or ISP task with an effective start date after 06/01/2019 and effective end date after 12/01/2019, such as 08/27/2019 - 05/31/2020.
•Any IEP or ISP task with an effective start date after 06/01/2019 and effective end date before 12/01/2019, such as 08/30/2019 - 11/15/2019.
•Any IEP or ISP task with an effective start date before 06/01/2019 and effective end date after 12/01/2019, such as 04/17/2019 - 04/16/2020.
Running the EMIS Review Report
Navigation: SpecialServices > EMIS > EMIS Review
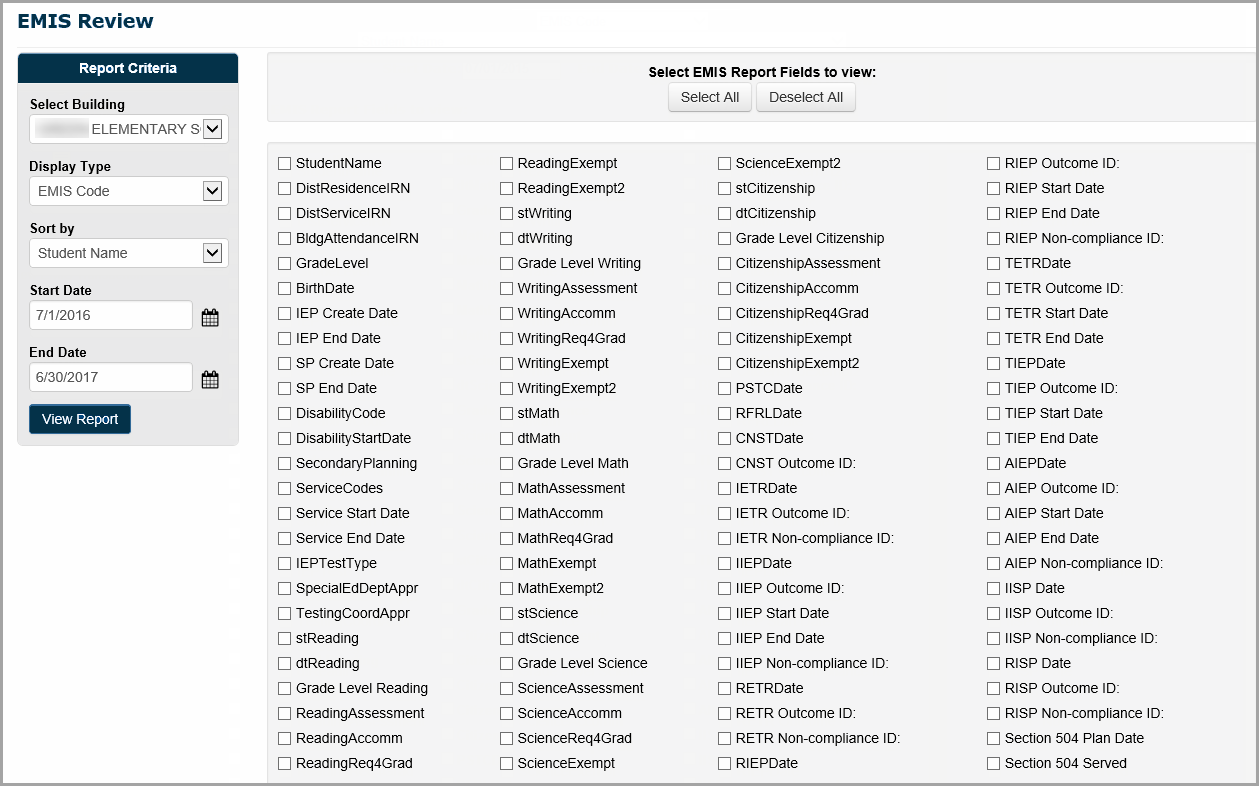
The EMIS Review report lists all of the students whose IEP, ETR, or ISP task has an event date that falls within a specified range and lets you (depending on your security privileges) view or edit the EMIS Data Collection Form after a task has been completed. You can select the information you want to display about the task on the report.
Note: The EMIS Review report includes only the completed tasks with the Include in Emis checkbox selected on the View Completed Tasks screen.
1.On the EMIS Review screen, in the Report Criteria area, in the Select Building drop-down list, select the building or class for which you want to run the EMIS Review report.
Note: Depending on your security privileges, either the Select Building or Select Class drop-down list displays.

2.In the Display Type drop-down list, select the display type for the report. This option determines how some of the data elements you select in step 3 display.
•EMIS Code – Displays only the EMIS code for the data element. For example, if you select to view the DistrResidenceIRN data element, only the IRN for the student’s district of residence displays on the EMIS Review report.
•Description – Displays only the description for the data element. For example, if you select to view the DistrResidenceIRN data element, only the description of the student’s district of residence displays on the EMIS Review report.
•EMIS Code & Description – Displays the EMIS code and description for the data element. For example, if you select to view the DistrResidenceIRN data element, the EMIS code and description for the student’s district of residence display on the EMIS Review report.
3.In the Sort by drop-down list, select the data element by which you want the system to sort the information on the report.
4.In the Start Date and End Date fields, enter the start and end date range within which you want to view the applicable tasks. See “How Tasks Are Selected by Date Range in EMIS.” The default date range is the current EMIS event year; for example, 07/01/2019 for the start date and 06/30/2020 for the end date.
5.In the Select EMIS Report Fields to view section, select the checkbox beside the data elements you want to display on the EMIS Review report. Ensure you select the data element by which you selected to sort the report in step 3.
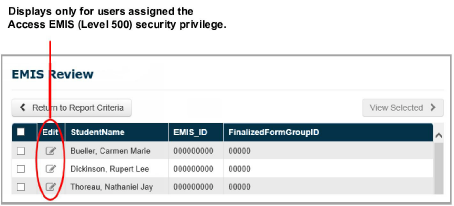
The EMIS Review report displays all of the completed tasks that fall within the selected criteria and have the Include in Emis checkbox selected on the View Completed Tasks screen.
7.You can perform one of the following optional actions:
•View the EMIS Data Collection Form for one or more tasks. See “Viewing the EMIS Data Collection Form.”
•Edit the EMIS Data Collection Form for a task. See “Editing the EMIS Data Collection Form.”
Viewing the EMIS Data Collection Form
Users assigned the Level 300 or 400 role can view the EMIS Data Collection Form for completed IEP, ETR, and ISP tasks from the EMIS Review report.
1.Run the EMIS Review report as described in step 1 through step 6 in “Running the EMIS Review Report.”
2.Beside each student and task you want to include in the DCF, select the checkbox.
3.Click View Selected.
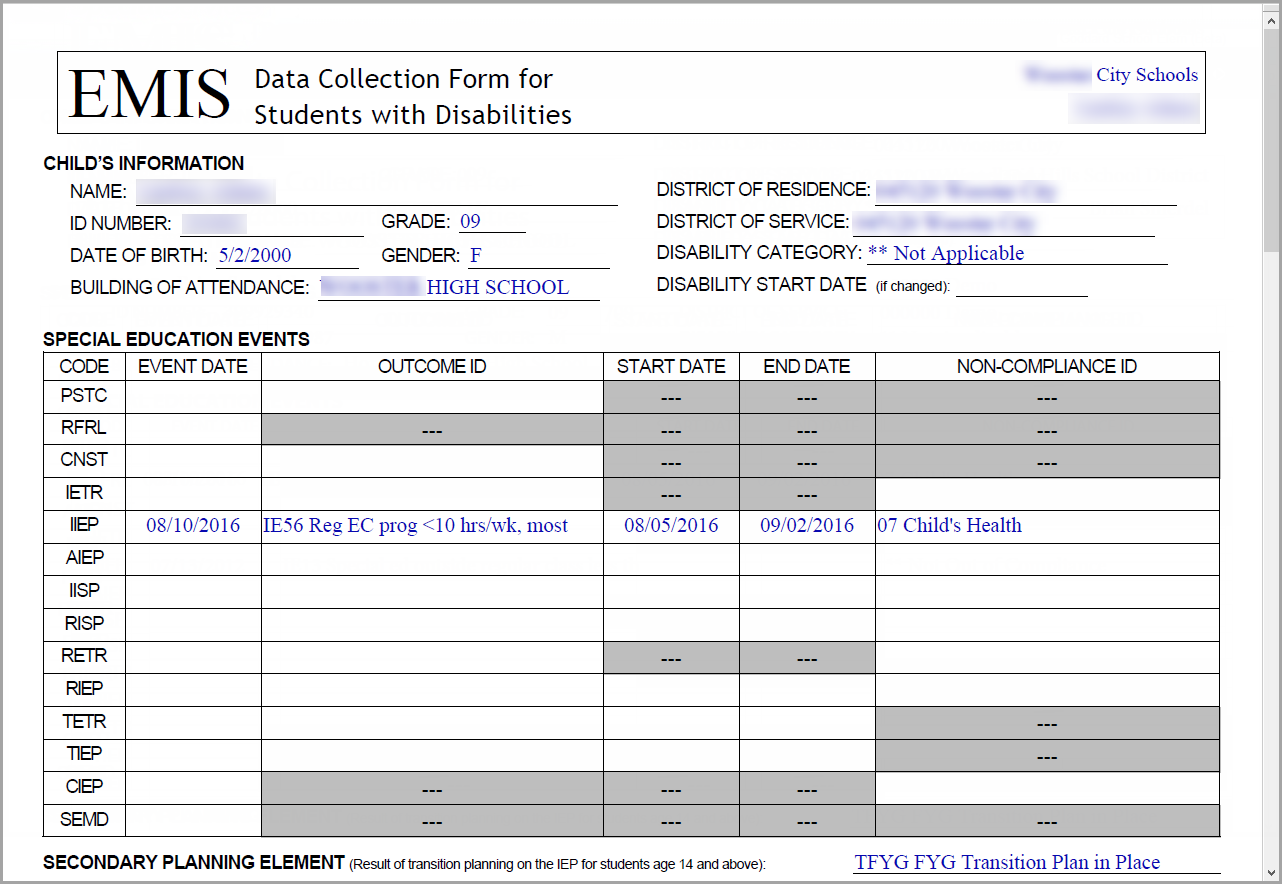
The EMIS Data Collection Form for the student(s) you selected displays in a new browser tab or window. If you selected multiple students, all of the forms are merged into a single file.
Editing the EMIS Data Collection Form
Users assigned the Level 500 role (or users assigned the Access EMIS security privilege) can edit the EMIS Data Collection Form. It is recommended that you modify only the fields on the EMIS Data Collection Form that cannot be corrected on the forms of a task. For more information about the recommended procedure for correcting errors in the EMIS extract, see “Correcting EMIS Extract Errors.”
1.Run the EMIS Review report as described in step 1 through step 6 in “Running the EMIS Review Report.”
2.In
the row of the applicable task, click ![]() .
.
The EMIS Data Collection Form for the student you selected displays in a new browser tab or window.
Note: You cannot delete the values in the Start Date and End Date fields for the IIEP, RIEP, and AIEP events. To delete the values in these fields, make the necessary changes on the IEP Cover Page.
Note: You cannot delete the values in the Start Date and End Date fields for the IISP and RISP events. To delete the values in these fields, make the necessary changes on the SP Cover Page.
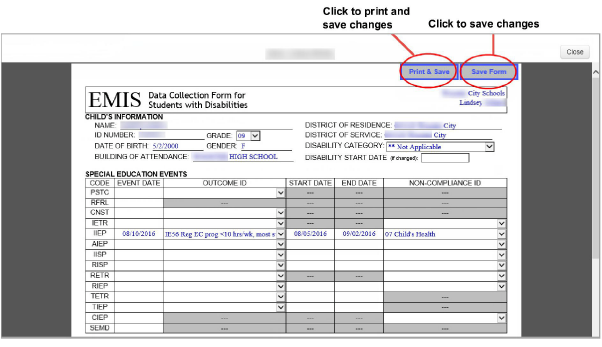
3.Modify the EMIS Data Collection Form as necessary.
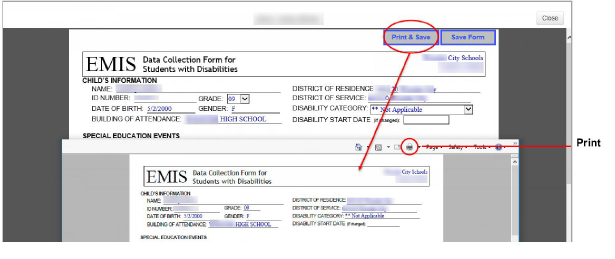
4.To print and save the form, click Print & Save. Or to save your changes, click Save Form.
Note: When you click Print & Save, the form is saved in the system, and the form opens in another window as a printable PDF.
Navigation: SpecialServices > EMIS > Build EMIS Extract
You can create an EMIS extract for all of the students in the entire district, the students in an individual building, or a specific student.
If missing or invalid data is detected in the process of creating the extract, the system generates an error log file that you can view to locate the source of each error. To ensure the correct information is reported to EMIS, you should resolve all data errors and create a new extract before importing it into StudentInformation. See “Correcting EMIS Extract Errors.”
Building an EMIS Extract by District
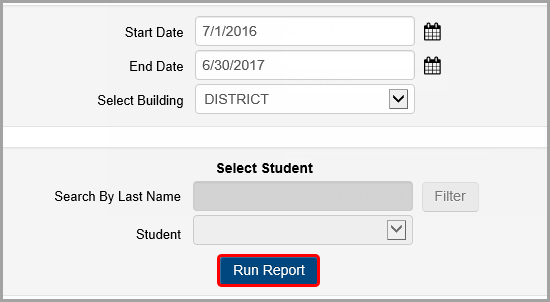
1.On the Build EMIS Extract screen, in the Start Date and End Date fields, enter the applicable start and end dates for which you want to build the extract. The default date range is the current EMIS event year. See “How Tasks Are Selected by Date Range in EMIS.”
2.In the Select Building drop-down list, select DISTRICT.
3.Click Run Report.
If the extract is created without error, an Extract Successful message displays along with a Click to Process link. The file is now available for import in StudentInformation (see the ProgressBook StudentInformation Import/Export Guide for more information).
Note: If you wish to download and save a local copy, click Click to Process to navigate to the Process EMIS Extract screen. You can also import the extract file into StudentInformation from the StudentInformation Special Education Import (SpS) screen.
Note: If the extract is created with errors, it does not display on the StudentInformation Special Education Import (SpS) screen.
If data is missing or invalid, an error log is created and an Errors Occurred message displays, listing the errors below it. You can open/save the files on the Process EMIS Extract screen. The file displays in the View Error File column.
Note: You can also view the error log file later from the Process EMIS Extract screen. See “Viewing the EMIS Extract and Error Log Files.”
Build EMIS Extract by Building
1.On the Build EMIS Extract screen, in the Start Date and End Date fields, enter the applicable start and end dates for which you want to build the extract. The default date range is the current EMIS event year. See “How Tasks Are Selected by Date Range in EMIS.”
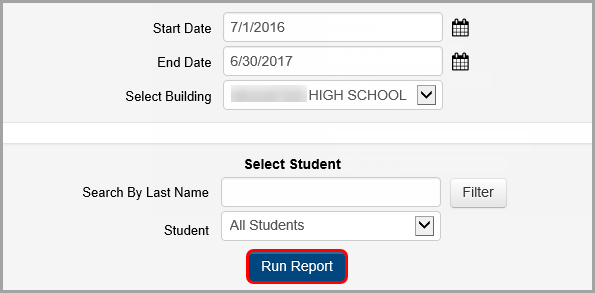
2.In the Select Building drop-down list, select the building for which you want to create the EMIS extract.
3.Click Run Report.
If the extract is created without error, an Extract Successful message displays along with a Click to Process link. The file is now available for import in StudentInformation (see the ProgressBook StudentInformation Import/Export Guide for more information).
Note: If you wish to download and save a local copy, click Click to Process to navigate to the Process EMIS Extract screen. You can also import the extract file into StudentInformation from the StudentInformation Special Education Import (SpS) screen.
Note: If the extract is created with errors, it does not display on the StudentInformation Special Education Import (SpS) screen.
If data is missing or invalid, an error log is created and an Errors Occurred message displays, listing the errors below it. You can open/save the files on the Process EMIS Extract screen. You can click the filename in the View Error File column to open/save the desired error log file.
Note: You can also view the error log file later from the Process EMIS Extract screen. See “Viewing the EMIS Extract and Error Log Files.”
Building an EMIS Extract by Student
1.On the Build EMIS Extract screen, in the Start Date and End Date fields, enter the applicable start and end dates for which you want to build the extract. The default date range is the current EMIS event year. See “How Tasks Are Selected by Date Range in EMIS.”
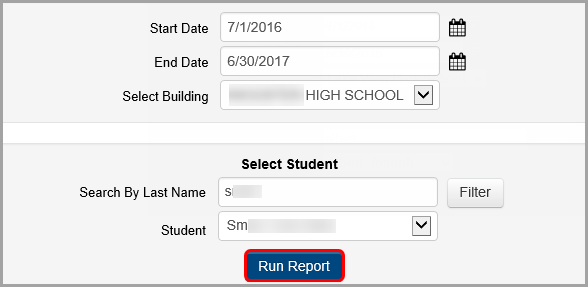
2.In the Select Building drop-down list, select the building in which the applicable student is enrolled.
3.In the Search By Last Name field, enter all or part of the student’s last name, and then click Filter.
The Student drop-down list refreshes with the students whose last name most closely matches the text you entered in the Search By Last Name field. If there is an exact match, the applicable student displays in the Student drop-down list.
4.If the appropriate student is not already selected, in the Student drop-down list, select the student.
5.Click Run Report.
If the extract is created without error, an Extract Successful message displays along with a Click to Process link. The file is now available for import in StudentInformation (see the ProgressBook StudentInformation Import/Export Guide for more information).
Note: If you wish to download and save a local copy, click Click to Process to navigate to the Process EMIS Extract screen. You can also import the extract file into StudentInformation from the StudentInformation Special Education Import (SpS) screen.
Note: If the extract is created with errors, it does not display on the StudentInformation Special Education Import (SpS) screen.
If data is missing or invalid, an error log is created and an Errors Occurred message displays, listing the errors below it. You can open/save the files on the Process EMIS Extract screen. You can click the filename in the View Error File column to open/save the desired error log file.
Note: You can also view the error log file later from the Process EMIS Extract screen. See “Viewing the EMIS Extract and Error Log Files.”
Viewing the EMIS Extract and Error Log Files
Navigation: SpecialServices > EMIS > Process EMIS Extract
The EMIS extract and associated error log file displays on the Process EMIS Extract screen. You can view the contents of these files to assist you in troubleshooting and correcting EMIS extract errors.

1.On Process EMIS Extract screen, perform one of the following actions:
•Click a file listed in the Filename column to open and/or save it.
•Click
 to
open and/or save the error file.
Both file types are in .txt format as shown below.
|
|
2.When you have finished viewing the file, close the window.
EMIS extracts and error log files are named using the selection criteria and school year for which
you create the extract. The naming convention varies based on whether you create an extract for
a district, building, or an individual student.
•“District-Level Extract Naming Convention”
•“Building-Level Extract Naming Convention”
•“Student Extract Naming Convention”
•“Error Log Naming Convention”
District-Level Extract Naming Convention
If you create the extract for an entire district, the filename comprises the following parts:
•The district IRN (prefixed by D); e.g., D999123.
•The fiscal year (prefixed by FY) for which you created the file; e.g., FY2020.
For example, an EMIS extract file for district 999123 in the 2019-2020 school year would display
as D999123_FY2020.txt.
Building-Level Extract Naming Convention
If you create the extract for a single building, the filename comprises the following parts:
•The building IRN (prefixed by B); e.g., B999321.
•The district IRN (prefixed by D); e.g., D999123.
•The fiscal year (prefixed by FY) for which you created the file; e.g., FY2020.
For example, an EMIS extract file run for building 999321 and district 999123 in the 2019-2020 school year would display as B999321_D999123_FY2020.txt.
Student Extract Naming Convention
If you create the extract for a single student, the file name comprises the following parts:
•The student’s EMIS ID (prefixed by S); e.g., S999246803.
•The district IRN (prefixed by D); e.g., D999123.
•The fiscal year (prefixed by FY); e.g., FY2020.
For example, an EMIS extract file run for student 999246803 and district 999123 in the 2019-2020 school year would display as S999246803_D999123_FY2020.txt.
Error log files are prefixed with “Errors” and use the file-naming convention of the corresponding EMIS extract file.
For example, an error log for an EMIS extract file run for student 999246803 and district 999123 in the 2019-2020 school year would display as Errors_S999246803_D999123_FY2020.txt.
Correcting EMIS Extract Errors
You should correct any errors in the EMIS extract by modifying the appropriate form in the task. Modify the EMIS Data Collection Form directly only in situations in which you need to quickly resolve an error. Any time you modify the EMIS Data Collection Form, you should correct the corresponding task so that it reflects the most current information for the student’s special education program.
1.Create a new task from the task that contains the incorrect information. See the “Create New Tasks from Existing Tasks” section of the ProgressBook SpecialServices Classic User Guide.
2.Correct the appropriate forms in the task as necessary.
3.Complete the task. See the “View Completed Tasks” chapter of the ProgressBook SpecialServices Classic User Guide.
4.On the View Completed Tasks screen, perform one of the following actions:
•For the task that contains the incorrect information, deselect the Include In Emis checkbox. See “Excluding Tasks from EMIS.”
or
•Delete the incorrect task.
5.Build the EMIS extract for the appropriate reporting period and student, and then verify that the error no longer occurs.
Note: When correcting errors, you may find it easier to verify that the error has been corrected by building the EMIS extract only for the student whose data you corrected.
Error Message |
Problem/Solution |
|---|---|
General |
|
No EMIS Data Found for specified Student(s). The extract file was not generated. |
Verify that there is an applicable task in the date range you specified. |
Building - Building IRN undeterminable for Building_DBID: |
Your building is not set up correctly in ProgressBook GradeBook. Contact your system manager. |
Building - Fiscal Year undeterminable for Building_DBID: |
Your building is not set up correctly in ProgressBook GradeBook. Contact your system manager. |
Student Attributes - Effective Date Record (FD) |
|
[Student Name (Last, First, Middle)] [EMIS ID] - FD - Effective Start Date missing for student with changed disability. |
Enter the appropriate date in the Meeting Date field on the ETR Cover Page or the ETR Completion Date on the IEP Cover Page or SP Cover Page as applicable for the indicated student. |
[Student Name (Last, First, Middle)] [EMIS ID] - FD - Grade Level undeterminable for student. |
Select the appropriate grade level from the Grade drop-down list on the Cover Page of the applicable task. |
[Student Name (Last, First, Middle)] [EMIS ID] - FD - Disability Code undeterminable for student. |
Your district is not set up correctly in ProgressBook SpecialServices Classic. Contact your system manager. |
[Student Name (Last, First, Middle)] [EMIS ID] - FD - Disability ‘16’ selected for student who is not in grade level ‘PS.’ |
The selected disability code (16 Developmental Delay) applies only to preschool students and the grade level of the indicated student is not preschool (PS). Select the correct disability for the student in the Disability Code list on the Student Properties window or the Disability Determination list on the ETR 4 Eligibility form. |
[Student Name (Last, First, Middle)] [EMIS ID] - FD - Disability '**' not selected for a student who is being served with a 504 Plan. |
Ensure that the disability condition is set to ** for the student being served by a 504 Plan whose FD record is being created. |
[Student Name (Last, First, Middle)] [EMIS ID] - FD - Effective Start Date missing for student being served with a 504 Plan. |
Enter an Effective Start Date for the student being served by a 504 Plan whose FD record is being created. |
[Student Name (Last, First, Middle)] [EMIS ID] - FD - The student being served with 504 Plan value is missing. |
Select the appropriate option for whether or not the student is served by a 504 Plan on the 504 Plan Signature form. |
Student Program Record (GQ) |
|
[Student Name (Last, First, Middle)] [EMIS ID] - GQ - Service [code] missing Start Date. |
Enter the appropriate date in the Begin field for the indicated service in the Related Services, Specially Designed Instruction, or Support for School Personnel section of IEP 7 or SP 2. |
[Student Name (Last, First, Middle)] [EMIS ID] - GQ - Service [code] missing End Date. |
Enter the appropriate date in the End field for the indicated service in the Related Services, Specially Designed Instruction, or Support for School Personnel section of IEP 7 or SP 2. |
Student Assessment Record (FA) |
|
[Student Name (Last, First, Middle)] [EMIS ID] - FA - Test [GRADE] Subject [SUBJECT] invalid Grade Level at Time of Test value for GN Assessment. |
The Assessment Type Code is GN and the Grade Level of Student at Time of Test is not 03 - 08. |
[Student Name (Last, First, Middle)] [EMIS ID] - FA - Test [GRADE] Subject [SUBJECT] invalid Grade Level at Time of Test value for GE Assessment. |
The Assessment Type Code is GE and the Grade Level of Student at Time of Test is not 07-12 or 23. |
[Student Name (Last, First, Middle)] [EMIS ID] - FA - Test [test] Subject [subject] missing Test Type value. |
A test type is not selected when an achievement test and grade level are selected for the indicated subject. The Type of Assessment field does not contain a value on the EMIS Data Collection Form. Select the checkbox for the test type in the Child Will Be Tested column for the indicated subject area and test on the appropriate Statewide and District Wide Testing form. |
[Student Name (Last, First, Middle)] [EMIS ID] - FA - Test [test] Subject [subject] invalid Grade Level at Time of Test value for [GO or GA or GX] Assessment. |
The grade level is not selected when an achievement test is selected for the indicated subject. Select the appropriate grade level in which the test will be administered in the Grade drop-down list for the indicated test and subject area on the appropriate Statewide and District Wide Testing form. |
[Student Name (Last, First, Middle)] [EMIS ID] - FA - Test [test] Subject [subject] Accommodation value not applicable for Test Type value selected. |
The Testing Accomm. field contains an invalid value on the EMIS Data Collection Form when an achievement test is selected for the indicated subject. Select the appropriate accommodation for the selected test type on the appropriate Statewide and District Wide Testing form. |
[Student Name (Last, First, Middle)] [EMIS ID] - FA - Test [test] Subject [subject] missing Accommodations value. |
A test type is not selected where an achievement test and grade level are selected for the indicated subject. The Testing Accomm. field does not contain a value on the EMIS Data Collection Form. Select the checkbox for the test type in the Child Will Be Tested column for the indicated subject area and test on the appropriate Statewide and District Wide Testing form. |
[Student Name (Last, First, Middle)] [EMIS ID] - FA - Alternate Assessment test type not applicable for Kindergarten Readiness (KRA-L). |
An invalid test type is selected when KG Assessment and a grade level are specified for the Reading subject area. An invalid value displays in the Type of Assessment field on the EMIS Data Collection Form. Select the checkbox for the test type in the Child Will Be Tested column for the Reading subject area on the appropriate Statewide and District Wide Testing form. |
[Student Name (Last, First, Middle)] [EMIS ID] - FA - Test [test] Subject [subject] missing Date of Test value. |
No date is entered for state tests. Select the date for the test in the Date of Test column on the appropriate Statewide and District Wide Testing form. |
[Student Name (Last, First, Middle)] [EMIS ID] - FA - Test XX Subject X Test Type of Alt is not valid for a 504 Plan. |
The selected Test Type of ALT is invalid for a 504 Plan. |
[Student Name (Last, First, Middle)] [EMIS ID] - FA - Test XX Subject X Accommodations value of 'Y2', 'Y3' or '**' is not valid for a 504 Plan. |
The selected Accommodations value of Y2, Y3, or ** is invalid for a 504 Plan. |
Student Special Education Record (GE) |
|
[Student Name (Last, First, Middle)] [EMIS ID] - GE - Event XXXX missing IEP Test Type value. |
Select the appropriate value in the IEP Test Type drop-down list on the Special Education Events form of the task for the indicated student. This error message is valid for the following events: IIEP, RIEP, AIEP, and TIEP. |
[Student Name (Last, First, Middle)] [EMIS ID] - GE - Event [Event] IEP Test Type value “***” not applicable for the event Outcome ID value selected. |
***
Not Applicable is selected in the IEP Test
Type drop-down list on the Special
Education Events form for an invalid IEP event. The •IEPD Resulted in Due Process •IENS IEP Completed - Not Served •IEPR IEP Completed - Parental Refusal The *** Not Applicable option is not valid for any TIEP events. Select the appropriate value in the IEP Test Type drop-down list on the Special Education Events form of the task for the indicated student. This error message is valid for the following events: IIEP, RIEP, AIEP, and TIEP. |
[Student Name (Last, First, Middle)] [EMIS ID] - GE - Event XXXX missing Secondary Planning value. |
Select the appropriate value in the Secondary Planning drop-down list on the Special Education Events form of a task for the indicated student. This error message is valid for the following events: IIEP, RIEP, and AIEP. |
[Student Name (Last, First, Middle)] [EMIS ID] - GE - No dates entered for any Special Education Events. |
No dates have been entered on the Special Education Events form for the task. Complete the appropriate information for the appropriate events on the Special Education Events form. |
[Student Name (Last, First, Middle)] [EMIS ID] - GE - [Event] missing Outcome ID value. |
Select the appropriate value in the Outcome ID drop-down list for the indicated event on the Special Education Events form. This error message is valid for the following events: PSTC, CNST, IIEP, IETR, RETR, RIEP, AIEP, TETR, TIEP, IISP and RISP. |
[Student Name (Last, First, Middle)] [EMIS ID] - GE - [Event] missing Event Date but Outcome ID is selected. |
Enter the appropriate date in the Date field for the indicated event on the Special Education Events form. This error message is valid for the following events: CNST, IIEP, IETR, RETR, RIEP, AIEP, TETR, and TIEP. |
[Student Name (Last, First, Middle)] [EMIS ID] - GE - [Event] missing Non-Compliance ID value. |
Select the appropriate value in the Non-compliance ID drop-down list for the indicated event on the Special Education Events form. This error message is valid for the following events: IETR, IIEP, RETR, RIEP, AIEP, CIEP, IISP, and RISP. |
[Student Name (Last, First, Middle)] [EMIS ID] - GE - [Event] missing Event Date but Non-Compliance ID is selected. |
Enter the appropriate date in the Date field for the indicated event on the Special Education Events form. This error message is valid for the following events: IETR, IIEP, RETR, RIEP, AIEP, and CIEP. |
[Student Name (Last, First, Middle)] [EMIS ID] - GE - Event TIEP missing End Date. |
Enter the appropriate date in the Date field for the indicated event on the Special Education Events form. |
[Student Name (Last, First, Middle)] [EMIS ID] - GE - Event TETR missing End Date. |
Enter the appropriate date in the Date field for the indicated event on the Special Education Events form. |
[Student Name (Last, First, Middle)] [EMIS ID] - GE - [Event] missing Start Date. |
Enter the appropriate date in the Start field for the IEP Effective Dates on the Cover Page. This error message is valid for the following events: IIEP, RIEP, and AIEP. |
[Student Name (Last, First, Middle)] [EMIS ID] - GE - [Event] missing End Date. |
Enter the appropriate date in the End field for the IEP Effective Dates on the Cover Page. This error message is valid for the following events: IIEP, RIEP and AIEP. |
[Student Name (Last, First, Middle)] [EMIS ID] - GE - [Event] missing Start Date. |
Enter the appropriate date in the Start field for the ISP Effective Dates on the Cover Page. This error message is valid for the following events: IISP and RISP. |
[Student Name (Last, First, Middle)] [EMIS ID] - GE - [Event] missing End Date. |
Enter the appropriate date in the End field for the ISP Effective Dates on the Cover Page. This error message is valid for the following events: IISP and RISP. |
Student Special Education Graduation Requirement Record (FE) |
|
[Student Name (Last, First, Middle)] [EMIS ID] - FE - Test [test] Subject [subject] missing Required for Graduation value. |
Required for Graduation value is missing when test grade level and subject type are selected for the indicated subject. This error message is valid for the following events: IIEP, RIEP, AIEP, TIEP, and CIEP. |
[Student Name (Last, First, Middle)] [EMIS ID] - FE - Test [test] Subject [subject] missing IEP Event Date. |
IEP Event Date is missing where subject type is selected for indicated subject. This error message is valid for the following events: IIEP, RIEP, AIEP, TIEP, and CIEP. |
[Student Name (Last, First, Middle)] [EMIS ID] - FE - Test XX Subject X Exemption Flag value of 'Y' is not valid for a 504 Plan. |
The Exemption Flag selection of Y is invalid for a 504 Plan. |
Navigation: SpecialServices > Completed Tasks > View Completed Tasks
The Include In Emis checkbox is selected by default for all IEP, ETR, and ISP tasks. You can exclude these tasks from reporting in the EMIS extract by deselecting the Include In Emis checkbox on the View Completed Tasks screen. For example, you may have several completed draft copies of an IEP that you do not want to include in the EMIS extract; you can deselect the Include in Emis checkbox for these drafts.

After you build the EMIS extract, the extract file, including any corresponding error log files, displays on the Process EMIS Extract screen. You can view the files, as described in “Viewing the EMIS Extract and Error Log Files,” or process the EMIS extract using one of the following options:
•Live processing – File is automatically ready for import in StudentInformation after each build.
•Local processing – Download the EMIS extract file and then import it into StudentInformation.
Contact your system manager for more information about which option your district uses to process the EMIS extract.
Processing EMIS Extract Files Locally
If your district uses the local processing option, you can download the EMIS extract file to a location—either on the hard drive of your computer or on the network—and import it into StudentInformation.
|
Caution: Processing a file removes it from the Special Education Import (SpS) screen in StudentInformation. Proceed with the following steps only if your district uses the local processing option. Otherwise, navigate to StudentInformation to import the file directly. |
1.On the Process EMIS Extract screen, the previously created EMIS extract files display.

2.To
open an EMIS extract file, click the name of the file in the Filename column.
You can also click  to open that error file.
3.Save the file.
4.Import the EMIS extract file on the Special Education Import (SpS) screen in StudentInformation.
5.Clear the old EMIS extract and error log files from the Process EMIS Extract screen. See “Purging the Process EMIS Extract Screen.”
Purging the Process EMIS Extract Screen
If your district processes the EMIS extract locally, the EMIS extract its associated error log file(s) are not automatically removed from the Process EMIS Extract screen. You may want to periodically purge the old files from the screen to make it easier to locate newer files.
Note: If you process the EMIS extract through an ITC or agency, the selected files are automatically purged when you process the EMIS extract.
1.On the Process EMIS Extract screen, the previously created EMIS extract files display.

2.Perform one of the following actions:
•Beside each file you want to purge, select the checkbox.
•To purge all of the files, click Select All.
3.To purge the selected files, click Process EMIS files.
The Processing Successful message displays. The files you selected in step 2 are removed from the Process EMIS Extract screen.
Viewing the EMIS Transaction Log
Navigation: SpecialServices > EMIS > View EMIS Transaction Log
If your district processes the EMIS extract through an ITC or agency, as described in “Viewing the EMIS Transaction Log,” you can view the status information on the EMIS Transaction Log screen. Additionally, you can purge the transaction activity within a date range when you no longer want it to display.

Purging Activity from the Transaction Log
Purging activity from the transaction log deletes only the status information that displays on the EMIS Transaction Log screen; this action does not delete EMIS extract or error log files stored locally or on the SpecialServices Classic web server.
1.On the View EMIS Transaction Log screen, the transfer log or activity for the previously created EMIS extract files display.
2.In the Purge Range side panel, enter the Start Date and End Date of the transaction log record(s) you wish to purge.
3.In the row(s) of the transaction log record(s) you want to purge, select the checkbox.
4.Click Purge.
The message Purge Successful displays. The transaction logs you selected in step 2 are removed from the Process EMIS Extract screen