|
|
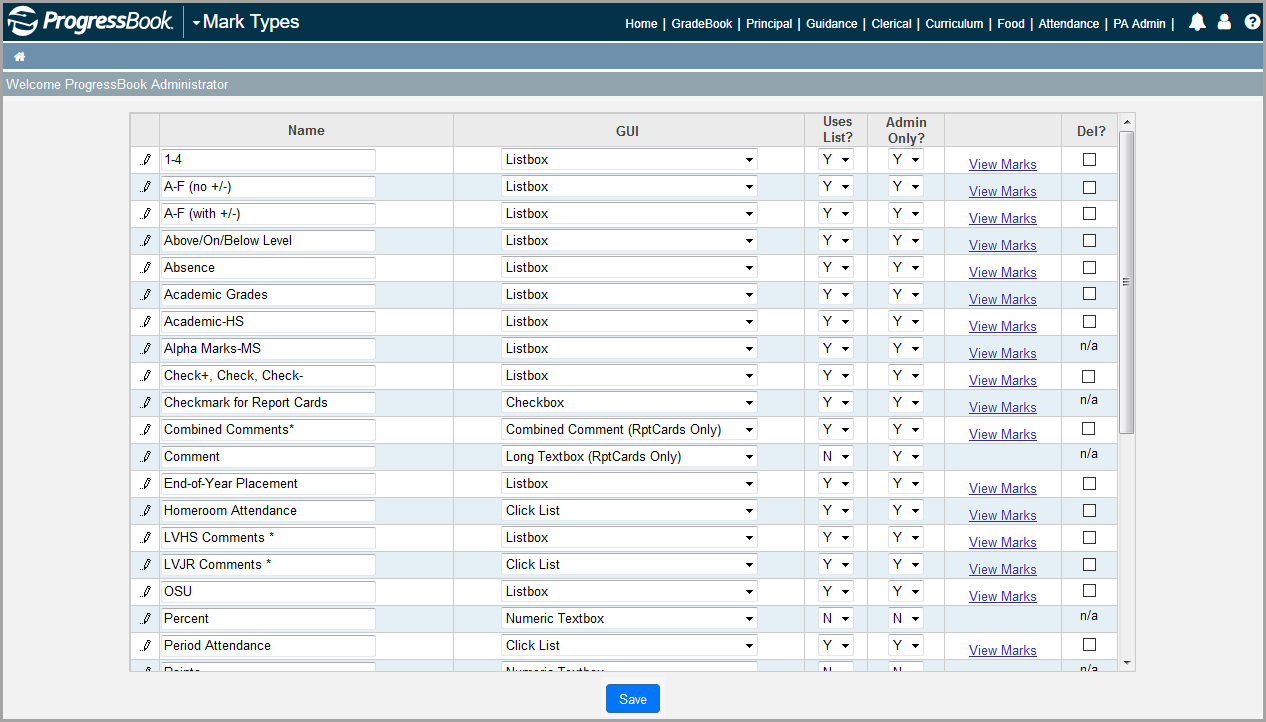
It is necessary to set up any custom mark types that your district will use in GradeBook for grading, attendance, or report card printing. You can make mark types available to all staff or limit to only users with administrative privileges.
1.On the Administrator Home Page, below Grading Setup, click Mark Types.
2.On the Mark Types screen, in the Name column, click inside an empty field, and enter the new mark type name.
3.In the GUI column from the drop-down list, select the desired graphical user interface option:
•Textbox – User can enter upper case, lower case, or mixed case alphanumeric text up to 50 characters (5 or fewer is recommended).
•Long Textbox (RptCards Only) – Displays a text box on the Report Card Entry screen in which the user can enter alphanumeric text up to 2000 characters (screen size may limit the ability to view the entire comment).
•Numeric Textbox – User can enter numeric text in decimal format in the text box up to 50 characters; for example, 999.99 (5 or fewer characters is recommended).
•Numeric with Overrides (RptCards Only) – Displays a text box on the Report Card Entry screen in which the user can enter numeric text in decimal format (up to 50 characters) in the text box, as well as valid alphabetic codes (number marks are calculated in the semester average, but code marks are not calculated in the semester average).
•List box – Displays a drop-down list of available options in alphanumeric text format from which the user must choose.
•Comment – Displays a comment icon that the user can click and then enter alphanumeric upper case, lower case, or mixed case text up to 2000 characters (for report cards that are sent to StudentInformation, the system can handle only 200 characters).
•Combined Comment (RptCards Only) – Provides the option of using either Coded Comments or Comments; the user can choose one option or the other for each student, but they may not use both options for the same student.
•Click List – Displays a box in which the user clicks repeatedly to display valid values in alphanumeric text format; each time the user clicks in the box, an option displays (3 or fewer options is recommended).
•Checkbox – Displays a check mark to indicate Yes/No or Complete/Incomplete as the user selects the checkbox.
•Radio Button – Lets a user choose one option in a group of 2 or more options.
Note: The GUI option selected here determines how the Mark field displays where marks are entered throughout GradeBook.
4.In the Uses List column, select the appropriate option to indicate whether you will provide the list of valid marks.
•Y – Yes
•N – No
5.In the Admin Only column, select the appropriate option to indicate whether this mark type should be available only on report cards and interims.
•Y – Yes
•N – No
6.Click Save.
The mark type displays in the Name column.
|
|
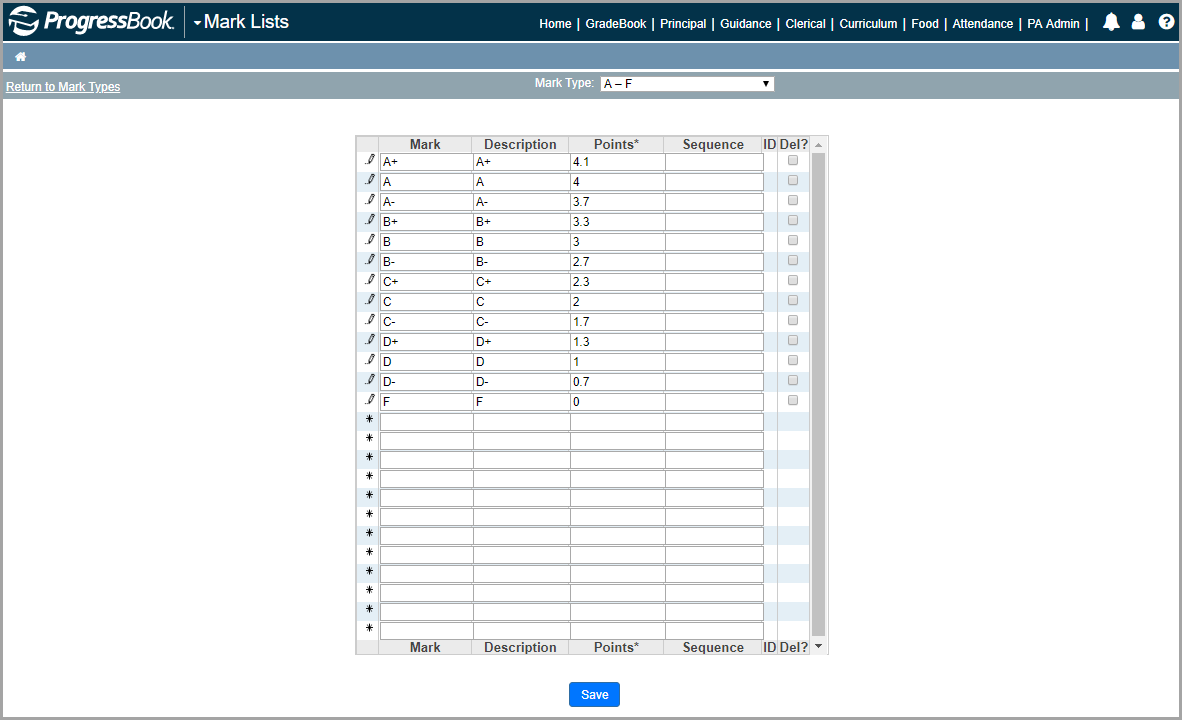
7.If you selected Y in the Uses List column indicating that you are going to provide a list of valid marks, click View Marks beside the mark type you just added.
a.On the Mark Lists screen, in the Mark column, enter the value or letter for the first valid mark.
b.In the Description column, enter a description of the mark that can be viewed when entering marks for assignments and report card grades.
c.In the Points column, enter a number that denotes the value of the mark.
d.(Optional) For mark types that do not have points entered, such as comment code, in the Sequence column, hover your cursor over the field until ![]() displays. Then, click
displays. Then, click ![]() to increase the number or
to increase the number or ![]() to decrease the number to denote the order in which marks should be displayed.
to decrease the number to denote the order in which marks should be displayed.
e.Leave the ID column blank because it is only used for imported mark types.
g.Repeat step a through step f to complete the list of valid marks for this mark type.
|
|